Sweet Home 3D : Prevent crashes and change icon

Sweet Home 3D is the best interior design application that I have found so far for Linux. It is easy to place your furniture on a house 2D plan, and render the whole scene in 3D.
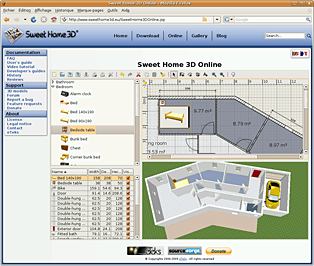
The website gives you the possibility to run the application online without installation, as being written in Java.
Unfortunately there are two points that bothered me for a while and that I fixed finally:
  1. The application crashes every time you choose the preferences or the 3D rendering from the menu.
  2. The application icon has a very low resolution and looks awful when rendered by the application launchers.

Install instructions

Sweet Home 3D can be installed from the GetDeb application repository, execute the following in the shell:
sudo -v
# Enable GetDeb Application repository:
sudo echo "deb http://archive.getdeb.net/ubuntu oneiric-getdeb apps #GetDeb repository extends the official repositories" > /etc/apt/sources.list.d/GetDeb-Apps-oneiric.list
# Add the repository GPG key
wget -q -O- http://archive.getdeb.net/getdeb-archive.key | sudo apt-key add -
# Update package information
sudo apt-get update

# Install Sweet Home 3D package
sudo apt-get install sweethome3d

Prevent crashes

Sweet Home 3D checks whether computing off-screen 3D images is supported by Java 3D on your computer, but the detection test itself makes Sweet Home 3D crash!

A special flag can be passed to the Java command line inside the launcher script.
The following shell commands change the original script, and leave a backup.

sudo -v
sed -i.bak 's/java /java -Dcom.eteks.sweethome3d.j3d.checkOffScreenSupport=false /' /usr/bin/sweethome3d

Change icon to higher resolution

Higher resolution icons can be found inside the source code, the following shell commands replaces the low resolution one with a higher one:
sudo -v
cd /tmp
wget -q http://sweethome3d.cvs.sourceforge.net/viewvc/*checkout*/sweethome3d/SweetHome3D/src/com/eteks/sweethome3d/viewcontroller/resources/help/images/sweethome3d.png
sudo cp /tmp/sweethome3d.png /usr/share/pixmaps/sweethome3d.png

Application launcher Kupfer

For some time I used Gnome-Do as application launcher, for its beautiful design and huge amount of plugins which enhance its features. But there were to things which bothered me lately:
  • Gnome-Do's Skype plug-in stopped worked time ago
  • Some applications that I removed already, still showed up in the search results
  • Icons weren't refreshed.
All recommended tips that I found in forums (remove certain folders from Gnome-Do) didn't help.
But in one of these threads they commented about another application: Kupfer.
Tried that one, and it works like a charm, connection to Skype works, almost has all plugins that I used from Gnome-Do and seems to integrate with Gnome, KDE and other systems.

Install instructions

Kupfer can be installed right away from the universal repository:
sudo apt-get install kupfer 
In it's preferences you could choose the same key-combination you used with Gnome-Do, and set it's auto-start flag.

Changing wallpapers with Wally

Years ago, I posted about tools for changing your desktop wallpaper automatically.
The best tool I found so far is Wally, which is able not only to rotate through your local wallpaper picture collection, but also obtain them from several online storages like Picasa, Flickr, remote folders, etc.
It permits to define tags to include certain sets of pictures that you like.

Install instructions

Wally can be found in the universe repository of your Ubuntu system.
sudo apt-get install wally

KUbuntu

Wally is available as desktop plugin, so you'll have to enable it in your desktop folder settings.

Ubuntu Oneiric

Ubuntu recently changed the management of the desktop wallpaper, which breaks Wally 2.3.2 (the one which can be found in the repository), it isn't able to replace the wallpaper. To repair this, you'll have to install the .deb package 2.4.3 from the developers website.

Update to Ubuntu 11.10 Oneiric Ocelot

These days, Ubuntu's new release hit the repositories, so I upgraded my three systems as soon as possible to see if some annoying Unity bugs have been solved finally. Here is the resume and the reasons why I'll evaluate to switch to KDE finally: Upgrade
During the upgrades I had two issues:
  1. Emacs got somehow broken on one system y prevented the upgrade process to finish completely. It even said, the process had been aborted, but the only thing missing was the last Cleanup step.
    I removed emacs packages and reinstalled them, then everything went fine.
  2. Screenblanker got stuck on one of my machines during upgrade, so I could hit on any button to enter the last Cleanup step.
    I connected via Remote Desktop to that machine and could finish the process correctly.
Updating custom repositories
As usual, the upgrade process disables all your custom repositories to prevent problems. You'll have to adapt and enabled them by hand, or you might use these instructions to do this with a few commands.
# Become super-user
sudo -i

# Set some variables (these can be changed to adapt to other Ubuntu versions)
export old=natty
export new=oneiric

# Enter repository list folder
cd /etc/apt/sources.list.d/

# Change old distribution list files and store them as newer ones
for sl in *-${old}.list ; do echo "Creating ${sl/${old}/${new}}" ; sed 's/\(.*\) '${old}'\(.*\)/\1 '${new}'\2/' $sl > ${sl/${old}/${new}} ; done

# Enable and remove the "disabled ..." comment
for sl in *-${new}.list ; do echo "Enabling ${sl}..." ; sed -i.bak 's/^# \(.*\) disabled on upgrade to '${new}'$/\1/' $sl ; done

# Check they are all fine
for sl in *-${new}.list ; do echo "Content of ${sl/${old}/${new}}:" ; cat $sl ; done

# Cleanup backup files and old distribution list files (not needed any longer)
rm *-${old}* *${new}.list.bak

Time tracking with Hamster indicator

At work, I find it very handy to track the time I'm spending on some tasks. Especially, if you have to report to someone the time you spend on certain projects or whatever.
Hamster is such a time tracker that I found to be very useful, easy to use, and enables you to obtain statistics about your daily/weekly/yearly work.

It gives you the possibility to introduce information from the shell, but there's also a graphical indicator available, which fits perfectly with Ubuntu Gnome and Unity.

Install instructions

If you need more details about the following installation and configuration commands, you can consult this article.
# Add repository
sudo add-apt-repository ppa:albertomilone/hamster-indicator

# Add description to repository for easier identification
sudo sed -i.save 's/$/ #Hamster-Indicator Time-Tracker/' /etc/apt/sources.list.d/albertomilone-hamster-indicator-natty.list

# Install Hamster Indicator
sudo apt-get update
sudo apt-get install hamster-indicator

Configuration

The hamster indicator permits to change how and which information to show on the Unity panel.
# Show all possible configuration values and values
gconftool-2 -R "/apps/hamster-indicator"

# Toggle Icon Glow
gconftool-2 --toggle "/apps/hamster-indicator/icon_glow"

# Toggle Show Label
gconftool-2 --toggle "/apps/hamster-indicator/show_label"

# Set enough space for label
gconftool-2 --set "/apps/hamster-indicator/label_length" --type int "20"

Database location

It might be interesting to now, where Hamster stores it's data, for example for backups, or if you want to copy/share the data to another Ubuntu installation.
~/.local/share/hamster-applet/hamster.db

Obtain some basic hardware details of your Ubuntu system

Unix systems are capable of recognizing lots of details of your hardware, so instead of having to open your PC for obtaining information like serial numbers, just use some shell commands.
Here is a list of such useful commands.

General system

grep -r . /sys/class/dmi/id/ 2>/dev/null
lsusb
lspcmcia
lspci -vvnn
udevadm info --export-db
lshal
sudo lshw

BIOS

sudo vpddecode    # Serials from BIOS, Motherboard
sudo biosdecode   # More details about BIOS
sudo dmidecode -q # Show information about valid BIOS components
sudo dmidecode    # Show also unknown/invalid BIOS components

CPU

lscpu
cat /proc/cpuinfo

Audio

cat /proc/asound/card*/codec#*

Drivers

lsmod

Upgrade to Picasa 3.8 on Ubuntu


If you're still stick to old 3.0 version of Picasa on your Ubuntu system (because you prefer it over Ubuntu's own programs, as I do), here are some instructions about how to upgrade Picasa to newer versions which have for example Face Recognition.

Install instructions

These instructions have been tested on Ubuntu Natty, and for Picasa 3.8, in case there's a newer version released you'll have to change it's location (search below for HERE).
## Add Google's testing repository for Picasa
sudo echo "deb http://dl.google.com/linux/deb/ testing non-free #Google Picasa" > /etc/apt/sources.list.d/google-unstable.list
sudo apt-key adv --keyserver keyserver.ubuntu.com --recv-keys 7FAC5991
sudo apt-get update
## Install Picasa 3.0
sudo apt-get install picasa

## Download Picasa 3.8 installer
# If there's a newer version you might to have to change it's name and location HERE
cd /tmp && wget http://dl.google.com/picasa/picasa38-setup.exe

## Install it (will not override your current Linux Picasa 3.0)
# Use default settings
wine /tmp/picasa38-setup.exe

## Copy over Picasa 3.8 files to your Linux Picasa 3.0 installation with backup
sudo cp -r /opt/google/picasa/3.0/wine/drive_c/Program\ Files/Google/Picasa3{,_3.0}
sudo cp -r ~/.wine/drive_c/Program\ Files/Google/Picasa3/* /opt/google/picasa/3.0/wine/drive_c/Program\ Files/Google/Picasa3/

## Uninstall the previous installed Picasa 3.8 (it's not needed any longer)
wine ~/.wine/drive_c/Program\ Files/Google/Picasa3/Uninstall.exe
Now you can run Picasa as usual from Applications --> Graphics --> Picasa --> Picasa
In case that something went wrong, you can find a backup of Picasa 3.0 in /opt/google/picasa/3.0/wine/drive_c/Program\ Files/Google/Picasa3_3.0

Reading Skype logs


If you use Skype a lot, for example at work, it will accumulate hundreds of chat database files .dbb on your system.
Information in these history files is partially compressed, so searching something particular in these files is only possible from Skype itself and its searching engine isn't very useful.

Better you use the Skype Logs Reader/Viewer, which is able to read these files and permits to search for text, export all text into several text or HTML formats, so you can use more powerful tools like your web browser, grep, word processor, spreadsheet, etc. to look for the information you remember vaguely you interchanged months or years ago.

Install instructions

This program doesn't need any installation, just unzip the archive anywhere you want.
It is designed for Windows, but runs fine with wine on your Ubuntu system.

Usage on Linux

As mentioned before, you need wine to run this program on Linux.
  • Just execute it with wine SkypeLogView.exe
  • In the dialog for locating Skype's database files, you'll have to enter
    h:\.Skype\yourusername
  • If you're not sure about which unit is mapped to your home folder you could obtain it from with winepath -w ~/.Skype

Manager for installing applications from PPA repositories

Search results for Chromium package.
I just discovered an application I was hoping for: Y PPA Manager.

Find easily the corresponding repository for a specific application, remove added PPA-repositories, etc., with this simple desktop tool.

Install instructions

The following command lines will install the tool, and I almost promise; this is the last time you add a repository from the command line.
# Add repository
sudo add-apt-repository ppa:webupd8team/y-ppa-manager

# Add description to repository for easier identification
sudo sed -i.bak 's/$/ #Y-PPA-Manager/' /etc/apt/sources.list.d/webupd8team-y-ppa-manager-natty.list

# Install
sudo apt-get update
sudo apt-get install y-ppa-manager

Features

  • For example, search for Chromium and it will offer you more than 20 repositories, from daily, beta, official ones.
  • It advises, if there isn't a repository for your current distro, for example, Ailurus still isn't available for Natty.
  • You can browse all packages offered by a repository before enabling it for your system.
  • Somehow, I often run into problems with PPA keys, maybe because I just copy the corresponding PPA entries from /etc/apt/sources.list.d to another machine.
    Each time I run the apt-get update command, I get lots of warnings about missing GPG keys.
    Y-PPA-Manager offers a command to clean up all these errors by automatically importing all missing keys.
  • The PPA-purge option disables a PPA from your Software Sources and reverts your system to normal after testing a new version from a PPA.
In short words: A-must-have-tool for Ubuntu.

Command line

You can also use Y-PPA-Manager commands directly from the shell (in case you still miss the terminal), just execute this to see all available commands:
y-ppa-cmd
launchpad-getkeys  # import all missing keys
ppa-purge              # remove a PPA repository source from your system

Convert existing PPA repositories to Natty

I'll offer you here some commands you might want to use to convert your existing PPA repositories to your upgraded distro.
When upgrading Ubuntu to a newer version, all your personal repositories will be disabled to prevent problems.
After the upgrade you'll have to enable them by hand, even worse, the ones you had disabled before upgrading still point to the repositories of the previous distro.
You might use some of these commands to make these changes automatically.
# Become super-user
sudo -i
# Enter repository list folder
cd /etc/apt/sources.list.d/
# Change maverick to natty for all maverick specific list files and store them as natty ones
for sl in *-maverick.list ; do echo ${sl/maverick/natty} ; sed 's/# \(.*\) maverick\(.*\)/\1 natty\2/' $sl > ${sl/maverick/natty} ; done
# Remove the "disabled ..." comment
for sl in *-natty.list ; do echo ${sl} ; sed -i.bak 's/ disabled on upgrade to natty$//' $sl ; done
# Check they are all fine
for sl in *-natty.list ; do echo ${sl/maverick/natty} ; cat $sl ; done
# Cleanup backup files and maverick list files (not needed any longer)
rm *-maverick* *.list.bak

Severe design flaw in Natty's Upgrade Process

Ubuntu's latest version 11.04 (Natty Narwhal) arrived a few days ago, some people hate it already before launched, high expectations by others.
Personally, I waited for that version several months already, hoping that it will resolve the slow problems I had on my personal laptop, as described on my previous post. Even changing the Kernel version, never solved the problem completely.
Here my update experience on three systems (all were 10.10).

Desktop PC

Machine gots stuck and hang during the upgrade process.
After rebooting, when trying the use the new Grub entry, it claims that my hardware doesn't support Unity.
After a second boot, entering the Previous Linux entry, my old 10.10 system started up perfectly and advised about a partial upgrade.
The upgrade continued smooth and left my system at the end with a running Natty.
Only my Chromium isn't usable any longer, but that's another story.

Dell home laptop

The 2nd, a smooth upgrade, without any problem.
First I downloaded the ISO image, and mounted the burned CD as software source, so most of the packages hadn't to be downloaded from the net.
After upgrade, the slow problem was gone, finally I have a fast system again, even compiz effects are usable again.
Great, all my expectations have been reached.

Lenovo office laptop

My last system hang too during the update process, it blocked with the screen-saver and I wasn't able to enter the desktop, so I couldn't see where exactly it got stuck.
Rebooting the system, first showed that Grub hadn't been updated yet, and even worse, my old system didn't booted up.
My root partition didn't mount correctly.
Inspecting with the SystemRescueCD (I have an entry to it's ISO in my Grub boot menu as explained in this post) revealed that the filesystem hadn't been damaged, all files where there.
After some investigation, I found this discussion about a serious design flaw in the Upgrade Process which could lead to that situation.
I could recover with the mentioned commands as seen below.

Recovering from not ready yet or not present root partition

mount -w -o remount /dev/sda1 /
dpkg --configure -a
Only one package made trouble, winbind, so I removed it with aptitude purge winbind, then run the dpkg command again and finally rebooted into a running Natty system.

Slow laptop with Ubuntu Maverick 10.10

Having installed Ubuntu Maverick on three systems, one desktop and two laptops, I really started to wonder, why during the past weeks my Dell laptop got slower and slower.
Opening two applications almost let the system being unusable.
Even worse, the frequency scaling of the CPU stopped working and was running at full speed all the time, heating the laptop, but going slow nevertheless.
First I thought it was a problem of the CPU scaling, so I installed cpufreqd, which at least slowed down the CPU a bit, very little.

Still wondering, ..., why?
I had installed my Dell laptop from zero, so I also thought it might have to do with the graphics driver, as compiz was impossible to use as well.

Then I started investigating a little further and I found several posts from users with the same symptoms, and everything pointed to a kernel 2.6.35 problems, the version that ships with Ubuntu 10.10

People said that upgrading to next kernel version solved that problem, so I tried that and it worked.
Now, I have a quicker system again.
Guess, I could have waited for Ubuntu 11.04, but if you have the same problem, and want to quick up your system, download a higher kernel version from here (2.6.36 rc7 for 32Bit, 2.6.36 rc8 for 64Bit systems).

Install instructions

wget -nc -q -P /tmp http://kernel.ubuntu.com/~kernel-ppa/mainline/v2.6.36-rc7-maverick/linux-{headers,image}-2.6.36-020636rc7{-generic,}_2.6.36-020636rc7.201010070908_{all,i386}.deb
sudo dpkg -i /tmp/linux-{headers,image}-2.6.36-020636rc7{-generic,}_2.6.36-020636rc7.201010070908_{all,i386}.deb
Software Update will offer you updates from kernel 2.6.35 which you might install without problem, as grub boot process will still find the newer 2.6.36 kernel and offers and boot that as the default one from the list anyway.